AR15/AR9 Info and Instructions
You will need an M16 profile bolt carrier to utilize our Push Button Safety assembly. Ar-9s will need the BCG weight trimmed.
-AR-15/AR-9 General Information and Instructions- Our Super Safetys are designed to be compatible with most AR platforms with minimal custom fitting. However, slight variations between different receiver and bolt carrier manufacturers may require minor adjustments to the lever if the bolt binds while manually cycling the action.
Installation Video
Basic Installation
Installing the Safety:
Insert the Push Button Safety from the left side of the receiver, with the keyhole slot entering first and facing upward. Ensure the Safety sits flush against the interior left-hand wall of the receiver.
Positioning the Lever:
Place the lever into the receiver, positioning it in front of the Safety. The "tail" of the lever should point toward the buffer tube. If installed backward, the Safety will not function properly.
Aligning the Safety:
Push the Safety further into the receiver until it lightly contacts the lever. Twist the Safety to align the keyhole slot with the lever, then press the Safety fully through the receiver.
Securing the Detent:
While holding the Safety in place to prevent it from falling out, rotate the receiver upside down so the safety detent hole is facing upward. Insert the included detent into the hole, ensuring the rounded end goes in first. Gently twist or pull the Safety until the detent seats correctly in the detent slot on the Safety.
Installing the Grip:
Position the safety selector spring inside the grip, then install the grip onto the receiver. Tighten the screw until fully secured.
Testing the Safety:
Test the Push Button Safety to ensure smooth operation. It should move easily between positions but with enough resistance to prevent unintentional movement.
Safety Positions:
Right (flush with receiver):
Fire
Left (flush with receiver):
Safe
Middle Position:
Active Safety
Note:
Do not shorten or modify the safety selector spring. The included detent is designed to match OEM specifications for proper function.
Dry fire testing for function
Initial Safety Check:
With the Safety assembly installed in your lower receiver (and the upper removed), test the Safety to ensure proper function:
Cock the hammer. Set the Push Button Safety to “Safe” (flush on the right side). Pull the trigger — the hammer should not release.
Switch the Safety to “Fire” (flush on the left side).Pull the trigger — the hammer should release.
Testing Active Safety Mode:
Recock the hammer and set the Safety to the middle position Active Safety mode. Pull the trigger and release the hammer. While holding the trigger down, cock the hammer again and manually move the lever rearward, simulating the bolt cycling. As the lever moves backward, the trigger should reset — you’ll feel and see it return to its reset position as the lever reaches a near-vertical orientation. After completing the rearward cycle, move the lever forward toward the hammer, again simulating the bolt cycling. Once the Safety rotates out of Active Safety and into “Fire”, you should be able to pull the trigger and release the hammer. Expect a very light trigger pull in this position.
Important Notes:
If the Safety is not fully rotated forward, the trigger will remain blocked in Active Safety mode, preventing the hammer from releasing. In Active Safety mode, the trigger will only reset if continuous pressure is maintained on it during the cycling process.
How To Videos
Below is videos on how to Modify, Install, and Test your Super Safety
Fitting the lever if the bolt binds
Reassemble & Safety Check:
After successfully completing the dry fire function test, install the upper receiver and verify the firearm is unloaded — ensure no live ammunition is present.
Lubrication & Initial Cycling:
Apply lubricant to the bolt carrier, fire control components, and Safety assembly. Manually cycle the action — the bolt carrier should move freely without binding.
If binding occurs, gently tap the muzzle device against a solid surface to release the bolt carrier.
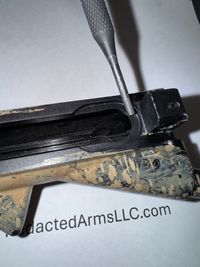
Addressing Bolt Carrier Binding:
Most AR-15 upper receivers feature a thin rear shelf. If the bolt carrier binds, remove part or all of this shelf using a Dremel to create additional clearance for the lever. After modifying the shelf, cycle the action again to check for binding. Fine-Tuning the Lever (If Needed): If the bolt carrier still binds, carefully grind or lightly sand the
top of the lever to allow smooth movement over the lever during cycling. Work gradually, sanding evenly and frequently testing the fit.
Final Fitment Test:
Continue sanding or grinding until the bolt carrier cycles smoothly — whether the firearm is pointed upward, downward, or horizontal — with no binding. Once achieved, the lever is properly fitted to the bolt carrier.
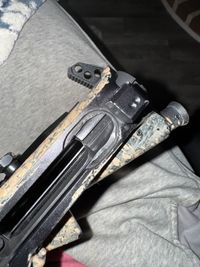
High Shelf Lower Receivers
Some lower receivers have a high shelf located behind the safety selector hole, extending above the halfway point of the hole. If your receiver has this feature, you’ll need to remove the portion of the shelf directly behind the safety selector hole to allow the lever to move fully into its rearmost position.
Using the Super Safety with a high shelf receiver without this modification can cause the bolt to strike and potentially damage the lever.
To modify the receiver, use a Dremel with a carbide cutter to trim the shelf directly behind the safety selector hole. This will create the necessary clearance for the lever to move freely.
Common issues with this include your Super Safety walking into Semi position!
High Shelf Lower Receiver Fix
AR-9 Bolt Carrier Modification
Most AR-9 bolt carriers feature an internal weight located in the rear portion of the carrier. Due to the design of the lever, this weight must be removed, have a small section cut out, and then be reinstalled into the bolt carrier.
This modification ensures the lever sits correctly during the forward cycle of the action.
Failure to create space for the lever can lead to bolt binding and may cause damage to the lever.